Well, now I know better...and I have decided to save you the cost of one chick magnet. Okay, to be fair, my wife referred to it as my mid-life crisis machine...but she is a chick...and she married me while I owned it, so I rest my case.
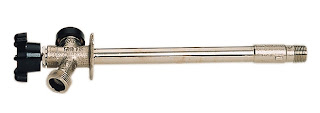
In climates in which the winter temperature drops well below freezing, most homes are now constructed with frost-free hose bibs. Such a valve extends for about a foot into the home and drains that one foot extension when the water is turned off. Prior to installation, they look like this:
A couple of years ago we took advantage of the real estate downturn to upgrade to a larger home that was equipped with such modern marvels. As the cold weather approached, we turned off the water supply to the external faucets and settled in for the winter. When Spring arrived, we turned the water back on and spent a nice day in the yard gardening...while our finished basement flooded.
So what did we do wrong? Well, it wasn't entirely our fault - the pipes were angled incorrectly and a particularly cold winter did us in. That said, we learned much that year from our plumber, so I am passing it on as I watch the mercury drop.
Step 1 - Disconnect your hoses
This is the one step that folks often forget to perform...and it is the primary reason that supply pipes to external hose bibs break. You can turn off the water at the supply valve for the bib, but if your hose is still connected to the faucet, you are done. The faucet cannot drain with the hose connected.
Step 2 - Disconnect your hoses
Seriously, our plumber puts his kids through college on this one. His words.
Step 3 - Turn off the water supply for the bib
The bib's water supply control valve is located somewhere in a heated portion of your home. If it has a round wheel, turn it clockwise until it will not turn further. If it is a lever, turn it one quarter turn.
Step 4 - Go back outside and open the faucet
This step allows the water in the pipe to drain...or at least some of it. If water keeps flowing, you didn't turn off the supply valve properly.
Step 5 - Open the bleed screw on the water supply control valve
Go back to the water supply control valve and look for a small screw on the valve. This should be the air bleed screw. Remove the screw to break the vacuum on pipe, which will allow the rest of the water to flow out of the external faucet. Note, some water will also come out of the bleed screw hole...so have a bucket handy. After several minutes, replace the screw.
Caution: If the original plumber installed your valve backwards (which was the case in my house), the bleed valve will be on the supply side. If that's the case, water will shoot out of this bleed valve at house pressure...and will not stop...until you put your finger over the hole and scream like a little girl for your wife...while your finger feels like it is being stabbed with a knife. Fortunately, my daughter could not find her video camera at the time.
Such an improper installation should be rare, but just to be safe, ensure that you have someone standing by next to the home's main water supply valve the first time that you remove these screws...and make sure that you also have a large bucket handy...just in case.
Step 6 - Close the external faucet
No need to let the cold air come into the pipe during the winter.
Step 7 - Insulate external faucets
This step may be overkill, but after you have been up to your hips is soggy drywall, it seems like a nice bit of added insurance. You can get Styrofoam freeze covers at your home supply store for just a couple of dollars...and they look like this:
Final Words
If you have any doubts, call a plumber and have them help you winterize your hose bibs the first time that you attempt it. Sure, that option may sound expensive...but I guarantee you that you will wish that you had done so if things go wrong in the Spring.
On that note, when you do turn the water supply back on in the Spring, do so with all faucets closed...and then listen near the valve for the sound of running water. You should hear some noise briefly as water rushes into the pipe and compresses the air, but the noise should stop fairly quickly. If it is constant and your faucets are closed, turn off the water supply quickly...and call that plumber.
cheers,
Scuba


No comments:
Post a Comment